Tampilkan postingan dengan label advanced. Tampilkan semua postingan

6 Quick Tips for International Websites

Note from the editors: After previously looking into various ways to handle internationalization for Google’s web-search, here’s a post from Google Web Studio team members with tips for web developers.

Many websites exist in more than one language, and more and more websites are made available for more than one language. Yet, building a website for more than one language doesn’t simply mean translation, or localization (L10N), and that’s it. It requires a few more things, all of which are related to internationalization (I18N). In this post we share a few tips for international websites.

1. Make pages I18N-ready in the markup, not the style sheets

Language and directionality are inherent to the contents of the document. If possible you should hence always use markup, not style sheets, for internationalization purposes. Use @lang and @dir, at least on the html element:

<html lang="ar" dir="rtl">

Avoid coming up with your own solutions like special classes or IDs.

As for I18N in style sheets, you can’t always rely on CSS: The CSS spec defines that conforming user agents may ignore properties like direction or unicode-bidi. (For XML, the situation changes again. XML doesn’t offer special internationalization markup, so here it’s advisable to use CSS.)

2. Use one style sheet for all locales

Instead of creating separate style sheets for LTR and RTL directionality, or even each language, bundle everything in one style sheet. That makes your internationalization rules much easier to understand and maintain.

So instead of embedding an alternative style sheet like

<link href="default.rtl.css" rel="stylesheet">

just use your existing

<link href="default.css" rel="stylesheet">

When taking this approach you’ll need to complement existing CSS rules by their international counterparts:

3. Use the [dir='rtl'] attribute selector

Since we recommend to stick with the style sheet you have (tip #2), you need a different way of selecting elements you need to style differently for the other directionality. As RTL contents require specific markup (tip #1), this should be easy: For most modern browsers, we can simply use [dir='rtl'].

Here’s an example:

aside {
 float: right;
 margin: 0 0 1em 1em;
}

[dir='rtl'] aside {
 float: left;
 margin: 0 1em 1em 0;
}

4. Use the :lang() pseudo class

To target documents of a particular language, use the :lang() pseudo class. (Note that we’re talking documents here, not text snippets, as targeting snippets of a particular language makes things a little more complex.)

For example, if you discover that bold formatting doesn’t work very well for Chinese documents (which indeed it does not), use the following:

:lang(zh) strong,
:lang(zh) b {
 font-weight: normal;
 color: #900;
}

5. Mirror left- and right-related values

When working with both LTR and RTL contents it’s important to mirror all the values that change directionality. Among the properties to watch out for is everything related to borders, margins, and paddings, but also position-related properties, float, or text-align.

For example, what’s text-align: left in LTR needs to be text-align: right in RTL.

There are tools to make it easy to “flip” directionality. One of them is CSSJanus, though it has been written for the “separate style sheet” realm, not the “same style sheet” one.

6. Keep an eye on the details

Watch out for the following items:
  • Images designed for left or right, like arrows or backgrounds, light sources in box-shadow and text-shadow values, and JavaScript positioning and animations: These may require being swapped and accommodated for in the opposite directionality.
  • Font sizes and fonts, especially for non-Latin alphabets: Depending on the script and font, the default font size may be too small. Consider tweaking the size and, if necessary, the font.
  • CSS specificity: When using the [dir='rtl'] (or [dir='ltr']) hook (tip #2), you’re using a selector of higher specificity. This can lead to issues. Just have an eye out, and adjust accordingly.

If you have any questions or feedback, check the Internationalization Webmaster Help Forum, or leave your comments here.

Getting started with structured data

Webmaster level: All

If Google understands your website’s content in a structured way, we can present that content more accurately and more attractively to Google users. For example, our algorithms can enhance your search results with “rich snippets” when we understand that your page is a structured product listing, event, recipe, review, or similar. We can also feature your data in Knowledge Graph panels or in Google Now cards, helping to spread the word about your content.

Today we’re excited to announce two features that make it simpler than ever before to participate in structured data features. The first is an expansion of Data Highlighter to seven new types of structured data. The second is a brand new tool, the Structured Data Markup Helper.

Support for Products, Businesses, Reviews and more in Data Highlighter

Data Highlighter launched in December 2012 as a point-and-click tool for teaching Google the pattern of structured data about events on your website — without even having to edit your site’s HTML. Now, you can also use Data Highlighter to teach us about many other kinds of structured data on your site: products, local businesses, articles, software applications, movies, restaurants, and TV episodes.

To get started, visit Webmaster Tools, select your site, click the "Optimization" link in the left sidebar, and click "Data Highlighter". You’ll be prompted to enter the URL of a typically structured page on your site (for example, a product or event’s detail page) and “tag” its key fields with your mouse.

Google Structured Data Highlighter

The tagging process takes about 5 minutes for a single page, or about 15 minutes for a pattern of consistently formatted pages. At the end of the process, you’ll have the chance to verify Google’s understanding of your structured data and, if it’s correct, “publish” it to Google. Then, as your site is recrawled over time, your site will become eligible for enhanced displays of information like prices, reviews, and ratings right in the Google search results.

New Structured Data Markup Helper tool

While Data Highlighter is a great way to quickly teach Google about your site’s structured data without having to edit your HTML, it’s ultimately preferable to embed structured data markup directly into your web pages, so your structured content is available to everyone. To assist web authors with that task, we’re happy to announce a new tool: the Structured Data Markup Helper.

Like in Data Highlighter, you start by submitting a web page (URL or HTML source) and using your mouse to “tag” the key properties of the relevant data type. When you’re done, the Structured Data Markup Helper generates sample HTML code with microdata markup included. This code can be downloaded and used as a guide as you implement structured data on your website.

Structured Data Markup Helper

The Structured Data Markup Helper supports a subset of data types, including all the types supported by Data Highlighter as well as several types used for embedding structured data in Gmail. Consult schema.org for complete schema documentation.

We hope these two tools make it easier for all websites to participate in Google’s growing suite of structured data features! As always, please post in our forums if you have any questions or feedback.

Using schema.org markup for organization logos

Webmaster level: all

Today, we’re launching support for the schema.org markup for organization logos, a way to connect your site with an iconic image. We want you to be able to specify which image we use as your logo in Google search results.

Using schema.org Organization markup, you can indicate to our algorithms the location of your preferred logo. For example, a business whose homepage is www.example.com can add the following markup using visible on-page elements on their homepage:

<div itemscope itemtype="http://schema.org/Organization">
<a itemprop="url" href="http://www.example.com/">Home</a>
<img itemprop="logo" src="http://www.example.com/logo.png" />
</div>

This example indicates to Google that this image is designated as the organization’s logo image for the homepage also included in the markup, and, where possible, may be used in Google search results. Markup like this is a strong signal to our algorithms to show this image in preference over others, for example when we show Knowledge Graph on the right hand side based on users’ queries.

As always, please ask us in the Webmaster Help Forum if you have any questions.

5 common mistakes with rel=canonical

Webmaster Level: Intermediate to Advanced

Including a rel=canonical link in your webpage is a strong hint to search engines your preferred version to index among duplicate pages on the web. It’s supported by several search engines, including Yahoo!, Bing, and Google. The rel=canonical link consolidates indexing properties from the duplicates, like their inbound links, as well as specifies which URL you’d like displayed in search results. However, rel=canonical can be a bit tricky because it’s not very obvious when there’s a misconfiguration.


While the webmaster sees the “red velvet” page on the left in their browser, search engines notice on the webmaster’s unintended “blue velvet” rel=canonical on the right.

We recommend the following best practices for using rel=canonical:
  • A large portion of the duplicate page’s content should be present on the canonical version.
  • One test is to imagine you don’t understand the language of the content—if you placed the duplicate side-by-side with the canonical, does a very large percentage of the words of the duplicate page appear on the canonical page? If you need to speak the language to understand that the pages are similar; for example, if they’re only topically similar but not extremely close in exact words, the canonical designation might be disregarded by search engines.
  • Double-check that your rel=canonical target exists (it’s not an error or “soft 404”)
  • Verify the rel=canonical target doesn’t contain a noindex robots meta tag
  • Make sure you’d prefer the rel=canonical URL to be displayed in search results (rather than the duplicate URL)
  • Include the rel=canonical link in either the <head> of the page or the HTTP header
  • Specify no more than one rel=canonical for a page. When more than one is specified, all rel=canonicals will be ignored.
Mistake 1: rel=canonical to the first page of a paginated series

Imagine that you have an article that spans several pages:
  • example.com/article?story=cupcake-news&page=1
  • example.com/article?story=cupcake-news&page=2
  • and so on
Specifying a rel=canonical from page 2 (or any later page) to page 1 is not correct use of rel=canonical, as these are not duplicate pages. Using rel=canonical in this instance would result in the content on pages 2 and beyond not being indexed at all.


Good content (e.g., “cookies are superior nutrition” and “to vegetables”) is lost when specifying rel=canonical from component pages to the first page of a series.

In cases of paginated content, we recommend either a rel=canonical from component pages to a single-page version of the article, or to use rel=”prev” and rel=”next” pagination markup.


rel=canonical from component pages to the view-all page


If rel=canonical to a view-all page isn’t designated, paginated content can use rel=”prev” and rel=”next” markup.

Mistake 2: Absolute URLs mistakenly written as relative URLs


The <link> tag, like many HTML tags, accepts both relative and absolute URLs. Relative URLs include a path “relative” to the current page. For example, “images/cupcake.png” means “from the current directory go to the “images” subdirectory, then to cupcake.png.” Absolute URLs specify the full path—including the scheme like http://.

Specifying <link rel=canonical href=“example.com/cupcake.html” /> (a relative URL since there’s no “http://”) implies that the desired canonical URL is http://example.com/example.com/cupcake.html even though that is almost certainly not what was intended. In these cases, our algorithms may ignore the specified rel=canonical. Ultimately this means that whatever you had hoped to accomplish with this rel=canonical will not come to fruition.

Mistake 3: Unintended or multiple declarations of rel=canonical

Occasionally, we see rel=canonical designations that we believe are unintentional. In very rare circumstances we see simple typos, but more commonly a busy webmaster copies a page template without thinking to change the target of the rel=canonical. Now the site owner’s pages specify a rel=canonical to the template author’s site.


If you use a template, check that you didn’t also copy the rel=canonical specification.

Another issue is when pages include multiple rel=canonical links to different URLs. This happens frequently in conjunction with SEO plugins that often insert a default rel=canonical link, possibly unbeknownst to the webmaster who installed the plugin. In cases of multiple declarations of rel=canonical, Google will likely ignore all the rel=canonical hints. Any benefit that a legitimate rel=canonical might have offered will be lost.

In both these types of cases, double-checking the page’s source code will help correct the issue. Be sure to check the entire <head> section as the rel=canonical links may be spread apart.


Check the behavior of plugins by looking at the page’s source code.

Mistake 4: Category or landing page specifies rel=canonical to a featured article

Let’s say you run a site about desserts. Your dessert site has useful category pages like “pastry” and “gelato.” Each day the category pages feature a unique article. For instance, your pastry landing page might feature “red velvet cupcakes.” Because the “pastry” category page has nearly all the same content as the “red velvet cupcake” page, you add a rel=canonical from the category page to the featured individual article.

If we were to accept this rel=canonical, then your pastry category page would not appear in search results. That’s because the rel=canonical signals that you would prefer search engines display the canonical URL in place of the duplicate. However, if you want users to be able to find both the category page and featured article, it’s best to only have a self-referential rel=canonical on the category page, or none at all.


Remember that the canonical designation also implies the preferred display URL. Avoid adding a rel=canonical from a category or landing page to a featured article.

Mistake 5: rel=canonical in the <body>

The rel=canonical link tag should only appear in the <head> of an HTML document. Additionally, to avoid HTML parsing issues, it’s good to include the rel=canonical as early as possible in the <head>. When we encounter a rel=canonical designation in the <body>, it’s disregarded.

This is an easy mistake to correct. Simply double-check that your rel=canonical links are always in the <head> of your page, and as early as possible if you can.


rel=canonical designations in the <head> are processed, not the <body>.

Conclusion

To create valuable rel=canonical designations:
  • Verify that most of the main text content of a duplicate page also appears in the canonical page.
  • Check that rel=canonical is only specified once (if at all) and in the <head> of the page.
  • Check that rel=canonical points to an existent URL with good content (i.e., not a 404, or worse, a soft 404).
  • Avoid specifying rel=canonical from landing or category pages to featured articles as that will make the featured article the preferred URL in search results.
And, as always, please ask any questions in our Webmaster Help forum.

Easier management of website verifications

Webmaster level: All

To help webmasters manage the verified owners for their websites in Webmaster Tools, we’ve recently introduced three new features:

  • Verification details view: You can now see the methods used to verify an owner for your site. In the Manage owners page for your site, you can now find the new Verification details link. This screenshot shows the verification details of a user who is verified using both an HTML file uploaded to the site and a meta tag:

    Where appropriate, the Verification details will have links to the correct URL on your site where the verification can be found to help you find it faster.

  • Requiring the verification method be removed from the site before unverifying an owner: You now need to remove the verification method from your site before unverifying an owner from Webmaster Tools. Webmaster Tools now checks the method that the owner used to verify ownership of the site, and will show an error message if the verification is still found. For example, this is the error message shown when an unverification was attempted while the DNS CNAME verification method was still found on the DNS records of the domain:

  • Shorter CNAME verification string: We’ve slightly modified the CNAME verification string to make it shorter to support a larger number of DNS providers. Some systems limit the number of characters that can be used in DNS records, which meant that some users were not able to use the CNAME verification method. We’ve now made the CNAME verification method have a fewer number of characters. Existing CNAME verifications will continue to be valid.

We hope this changes make it easier for you to use Webmaster Tools. As always, please post in our Verification forum if you have any questions or feedback.

Making search-friendly mobile websites — now in 11 more languages

Webmaster level: Intermediate

As more and more users worldwide with mobile devices access the Internet, it’s fantastic to see so many websites making their content accessible and useful for those devices. To help webmasters optimize their sites we launched our recommendations for smartphones, feature-phones, tablets, and Googlebot-friendly sites in June 2012.

We’re happy to announce that those recommendations are now also available in Arabic, Brazilian Portuguese, Dutch, French, German, Italian, Japanese, Polish, Russian, Simplified Chinese, and Spanish. US-based webmasters are welcome to read the UK-English version.

We welcome you to go through our recommendations, pick the configuration that you feel will work best with your website, and get ready to jump on the mobile bandwagon!

Thanks to the fantastic webmaster-outreach team in Dublin, Tokyo and Beijing for making this possible!

New first stop for hacked site recovery

Webmaster Level: All

We certainly hope you never have to use our new Help for hacked sites informational series. It's a dozen articles and over an hour of videos dedicated to helping webmasters in the unfortunate event that their site is compromised.


Overview: How and why sites are hacked

If you have further interest in why cybercriminals hack sites for spammy purposes, see Tiffany Oberoi’s explanation in Step 5: Assess the damage (hacked with spam).

Tiffany Oberoi, a Webspam engineer, shares more information about sites hacked with spam

And if you’re curious about malware, Lucas Ballard from our Safe Browsing team, explains more about the topic in Step 5: Assess the damage (hacked with malware).

Lucas Ballard, a Safe Browsing engineer, and I pretend to have a totally natural conversation about malware

While we attempt to outline the necessary steps in recovery, each task remains fairly difficult for site owners unless they have advanced knowledge of system administrator commands and experience with source code. For helping fellow webmasters through the difficult recovery time, we'd like to thank the steady members in Webmaster Forum. Specifically, in the subforum Malware and hacked sites, we'd be remiss not to mention the amazing contributions of Redleg and Denis Sinegubko.

How to avoid ever needing Help for hacked sites
Just as you focus on making a site that's good for users and search-engine friendly, keeping your site secure -- for you and your visitors -- is also paramount. When site owners fail to keep their site secure, hackers may exploit the vulnerability. If a hacker exploits a vulnerability, then you might need Help for hacked sites. So, to potentially avoid this scenario:
  • Be vigilant about keeping software updated
  • Understand the security practices of all applications, plugins, third-party software, etc., before you install them on your server. A security vulnerability in one software application can affect the safety of your entire site
  • Remove unnecessary or unused software
  • Enforce creation of strong passwords
  • Keep all devices used to log in to your servers secure (updated operating system and browser)
  • Make regular, automated backups of your site
Help for hacked sites can be found at www.google.com/webmasters/hacked. We look forward to not seeing you there!

A reminder about selling links that pass PageRank

Webmaster level: all

Google has said for years that selling links that pass PageRank violates our quality guidelines. We continue to reiterate that guidance periodically to help remind site owners and webmasters of that policy.

Please be wary if someone approaches you and wants to pay you for links or "advertorial" pages on your site that pass PageRank. Selling links (or entire advertorial pages with embedded links) that pass PageRank violates our quality guidelines, and Google does take action on such violations. The consequences for a linkselling site start with losing trust in Google's search results, as well as reduction of the site's visible PageRank in the Google Toolbar. The consequences can also include lower rankings for that site in Google's search results.

If you receive a warning for selling links that pass PageRank in Google's Webmaster Tools, you'll see a notification message to look for "possibly artificial or unnatural links on your site pointing to other sites that could be intended to manipulate PageRank." That's an indication that your site has lost trust in Google's index.

To address the issue, make sure that any paid links on your site don't pass PageRank. You can remove any paid links or advertorial pages, or make sure that any paid hyperlinks have the rel="nofollow" attribute. After ensuring that no paid links on your site pass PageRank, you can submit a reconsideration request and if you had a manual webspam action on your site, someone at Google will review the request. After the request has been reviewed, you'll get a notification back about whether the reconsideration request was granted or not.

We do take this issue very seriously, so we recommend you avoid selling (and buying) links that pass PageRank in order to prevent loss of trust, lower PageRank in the Google Toolbar, lower rankings, or in an extreme case, removal from Google's search results.

A faster image search

Webmaster level: all

People looking for images on Google often want to browse through many images, looking both at the images and their metadata (detailed information about the images). Based on feedback from both users and webmasters, we redesigned Google Images to provide a better search experience. In the next few days, you’ll see image results displayed in an inline panel so it’s faster, more beautiful, and more reliable. You will be able to quickly flip through a set of images by using the keyboard. If you want to go back to browsing other search results, just scroll down and pick up right where you left off.

Screenshot of new Google Images results using the query nasa earth as an example


Here’s what it means for webmasters:
  • We now display detailed information about the image (the metadata) right underneath the image in the search results, instead of redirecting users to a separate landing page.
  • We’re featuring some key information much more prominently next to the image: the title of the page hosting the image, the domain name it comes from, and the image size.
  • The domain name is now clickable, and we also added a new button to visit the page the image is hosted on. This means that there are now four clickable targets to the source page instead of just two. In our tests, we’ve seen a net increase in the average click-through rate to the hosting website.
  • The source page will no longer load up in an iframe in the background of the image detail view. This speeds up the experience for users, reduces the load on the source website’s servers, and improves the accuracy of webmaster metrics such as pageviews. As usual, image search query data is available in Top Search Queries in Webmaster Tools.
As always, please ask on our Webmaster Help forum if you have questions.

Webmaster Tools verification strategies

Webmaster level: all

Verifying ownership of your website is the first step towards using Google Webmaster Tools. To help you keep verification simple & reduce its maintenance to a minimum, especially when you have multiple people using Webmaster Tools, we’ve put together a small list of tips & tricks that we’d like to share with you:
  • The method that you choose for verification is up to you, and may depend on your CMS & hosting providers. If you want to be sure that changes on your side don’t result in an accidental loss of the verification status, you may even want to consider using two methods in parallel.
  • Back in 2009, we updated the format of the verification meta tag and file. If you’re still using the old format, we recommend moving to the newer version. The newer meta tag is called “google-site-verification, and the newer file format contains just one line with the file name. While we’re currently supporting ye olde format, using the newer one ensures that you’re good to go in the future.
  • When removing users’ access in Webmaster Tools, remember to remove any active associated verification tokens (file, meta tag, etc.). Leaving them on your server means that these users would be able to gain access again at any time. You can view the site owners list in Webmaster Tools under Configuration / Users.
  • If multiple people need to access the site, we recommend using the “add users” functionality in Webmaster Tools. This makes it easier for you to maintain the access control list without having to modify files or settings on your servers.
  • Also, if multiple people from your organization need to use Webmaster Tools, it can be a good policy to only allow users with email addresses from your domain. By doing that, you can verify at a glance that only users from your company have access. Additionally, when employees leave, access to Webmaster Tools is automatically taken care of when that account is disabled.
  • Consider using “restricted” (read-only) access where possible. Settings generally don’t need to be changed on a daily basis, and when they do need to be changed, it can be easier to document them if they have to go through a central account.

We hope these tips help you to simplify the situation around verification of your website in Webmaster Tools. For more questions about verification, feel free to drop by our Webmaster Help Forums.

Helping Webmasters with Hacked Sites

Webmaster Level : Intermediate/Advanced

Having your website hacked can be a frustrating experience and we want to do everything we can to help webmasters get their sites cleaned up and prevent compromises from happening again. With this post we wanted to outline two common types of attacks as well as provide clean-up steps and additional resources that webmasters may find helpful.

To best serve our users it’s important that the pages that we link to in our search results are safe to visit. Unfortunately, malicious third-parties may take advantage of legitimate webmasters by hacking their sites to manipulate search engine results or distribute malicious content and spam. We will alert users and webmasters alike by labeling sites we’ve detected as hacked by displaying a “This site may be compromised” warning in our search results:


We want to give webmasters the necessary information to help them clean up their sites as quickly as possible. If you’ve verified your site in Webmaster Tools we’ll also send you a message when we’ve identified your site has been hacked, and when possible give you example URLs.

Occasionally, your site may become compromised to facilitate the distribution of malware. When we recognize that, we’ll identify the site in our search results with a label of “This site may harm your computer” and browsers such as Chrome may display a warning when users attempt to visit. In some cases, we may share more specific information in the Malware section of Webmaster Tools. We also have specific tips for preventing and removing malware from your site in our Help Center.

Two common ways malicious third-parties may compromise your site are the following:

Injected Content


Hackers may attempt to influence search engines by injecting links leading to sites they own. These links are often hidden to make it difficult for a webmaster to detect this has occurred. The site may also be compromised in such a way that the content is only displayed when the site is visited by search engine crawlers.


Example of injected pharmaceutical content

If we’re able to detect this, we’ll send a message to your Webmaster Tools account with useful details. If you suspect your site has been compromised in this way, you can check the content your site returns to Google by using the Fetch as Google tool. A few good places to look for the source of such behavior of such a compromise are .php files, template files and CMS plugins.

Redirecting Users


Hackers might also try to redirect users to spammy or malicious sites. They may do it to all users or target specific users, such as those coming from search engines or those on mobile devices. If you’re able to access your site when visiting it directly but you experience unexpected redirects when coming from a search engine, it’s very likely your site has been compromised in this manner.

One of the ways hackers accomplish this is by modifying server configuration files (such as Apache’s .htaccess) to serve different content to different users, so it’s a good idea to check your server configuration files for any such modifications.


This malicious behavior can also be accomplished by injecting JavaScript into the source code of your site. The JavaScript may be designed to hide its purpose so it may help to look for terms like “eval”, “decode”, and “escape”.


Cleanup and Prevention


If your site has been compromised, it’s important to not only clean up the changes made to your site but to also address the vulnerability that allowed the compromise to occur. We have instructions for cleaning your site and preventing compromises while your hosting provider and our Malware and Hacked sites forum are great resources if you need more specific advice.

Once you’ve cleaned up your site you should submit a reconsideration request that if successful will remove the warning label in our search results.

As always, if you have any questions or feedback, please tell us in the Webmaster Help Forum.

Giving Tablet Users the Full-Sized Web

Webmaster level: All

Since we announced Google’s recommendations for building smartphone-optimized websites, a common question we’ve heard from webmasters is how to best treat tablet devices. This is a similar question Android app developers face, and for that the Building Quality Tablet Apps guide is a great starting point.

Although we do not have specific recommendations for building search engine friendly tablet-optimized websites, there are some tips for building websites that serve smartphone and tablet users well.

When considering your site’s visitors using tablets, it’s important to think about both the devices and what users expect. Compared to smartphones, tablets have larger touch screens and are typically used on Wi-Fi connections. Tablets offer a browsing experience that can be as rich as any desktop or laptop machine, in a more mobile, lightweight, and generally more convenient package. This means that, unless you offer tablet-optimized content, users expect to see your desktop site rather than your site’s smartphone site.

The NY Times mobile and tablet experience

Our recommendation for smartphone-optimized sites is to use responsive web design, which means you have one site to serve all devices. If your website uses responsive web design as recommended, be sure to test your website on a variety of tablets to make sure it serves them well too. Remember, just like for smartphones, there are a variety of device sizes and screen resolutions to test.

Another common configuration is to have separate sites for desktops and smartphones, and to redirect users to the relevant version. If you use this configuration, be careful not to inadvertently redirect tablet users to the smartphone-optimized site too.

Telling Android smartphones and tablets apart

For Android-based devices, it’s easy to distinguish between smartphones and tablets using the user-agent string supplied by browsers: Although both Android smartphones and tablets will include the word “Android” in the user-agent string, only the user-agent of smartphones will include the word “Mobile”.

In summary, any Android device that does not have the word “Mobile” in the user-agent is a tablet (or other large screen) device that is best served the desktop site.

For example, here’s the user-agent from Chrome on a Galaxy Nexus smartphone:

Mozilla/5.0 (Linux; Android 4.1.1; Galaxy Nexus Build/JRO03O) AppleWebKit/535.19 (KHTML, like Gecko) Chrome/18.0.1025.166 Mobile Safari/535.19

Or from Firefox on the Galaxy Nexus:

Mozilla/5.0 (Android; Mobile; rv:16.0) Gecko/16.0 Firefox/16.0

Compare those to the user-agent from Chrome on Nexus 7:

Mozilla/5.0 (Linux; Android 4.1.1; Nexus 7 Build/JRO03S) AppleWebKit/535.19 (KHTML, like Gecko) Chrome/18.0.1025.166 Safari/535.19

Or from Firefox on Nexus 7:

Mozilla/5.0 (Android; Tablet; rv:16.0) Gecko/16.0 Firefox/16.0

Because the Galaxy Nexus’s user agent includes “Mobile” it should be served your smartphone-optimized website, while the Nexus 7 should receive the full site.

We hope this helps you build better tablet-optimized websites. As always, please ask on our Webmaster Help forums if you have more questions.


Make the web faster with mod_pagespeed, now out of Beta


If your page is on the web, speed matters. For developers and webmasters, making your page faster shouldn’t be a hassle, which is why we introduced mod_pagespeed in 2010. Since then the development team has been working to improve the functionality, quality and performance of this open-source Apache module that automatically optimizes web pages and their resources. Now, after almost two years and eighteen releases, we are announcing that we are taking off the Beta label.

We’re committed to working with the open-source community to continue evolving mod_pagespeed, including more, better and smarter optimizations and support for other web servers. Over 120,000 sites are already using mod_pagespeed to improve the performance of their web pages using the latest techniques and trends in optimization. The product is used worldwide by individual sites, and is also offered by hosting providers, such as DreamHost, Go Daddy and content delivery networks like EdgeCast. With the move out of beta we hope that even more sites will soon benefit from the web performance improvements offered through mod_pagespeed.

mod_pagespeed is a key part of our goal to help make the web faster for everyone. Users prefer faster sites and we have seen that faster pages lead to higher user engagement, conversions, and retention. In fact, page speed is one of the signals in search ranking and ad quality scores. Besides evangelizing for speed, we offer tools and technologies to help measure, quantify, and improve performance, such as Site Speed Reports in Google Analytics, PageSpeed Insights, and PageSpeed Optimization products. In fact, both mod_pagespeed and PageSpeed Service are based on our open-source PageSpeed Optimization Libraries project, and are important ways in which we help websites take advantage of the latest performance best practices.


To learn more about mod_pagespeed and how to incorporate it in your site, watch our recent Google Developers Live session or visit the mod_pagespeed product page.

Rich snippets guidelines

Webmaster level: All


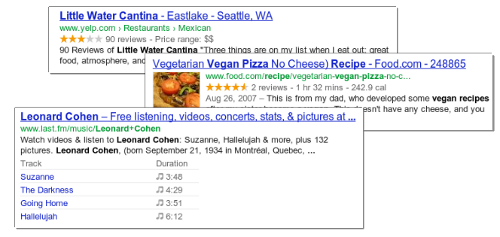
Traditional, text-only, search result snippets aim to summarize the content of a page in our search results. Rich snippets (shown above) allow webmasters to help us provide even better summaries using structured data markup that they can add to their pages. Today we're introducing a set of guidelines to help you implement high quality structured data markup for rich snippets.

Once you've correctly added structured data markup to you site, rich snippets are generated algorithmically based on that markup. If the markup on a page offers an accurate description of the page's content, is up-to-date, and is visible and easily discoverable on your page and by users, our algorithms are more likely to decide to show a rich snippet in Google’s search results.

Alternatively, if the rich snippets markup on a page is spammy, misleading, or otherwise abusive, our algorithms are much more likely to ignore the markup and render a text-only snippet. Keep in mind that, while rich snippets are generated algorithmically, we do reserve the right to take manual action (e.g., disable rich snippets for a specific site) in cases where we see actions that hurt the experience for our users.

To illustrate these guidelines with some examples:
  • If your page is about a band, make sure you mark up concerts being performed by that band, not by related bands or bands in the same town.
  • If you sell products through your site, make sure reviews on each page are about that page's product and not the store itself.
  • If your site provides song lyrics, make sure reviews are about the quality of the lyrics, not the quality of the song itself.
In addition to the general rich snippets quality guidelines we're publishing today, you'll find usage guidelines for specific types of rich snippets in our Help Center. As always, if you have any questions or feedback, please tell us in the Webmaster Help Forum.

Google Webmaster Guidelines updated

Webmaster level: All

Today we’re happy to announce an updated version of our Webmaster Quality Guidelines. Both our basic quality guidelines and many of our more specific articles (like those on links schemes or hidden text) have been reorganized and expanded to provide you with more information about how to create quality websites for both users and Google.

The main message of our quality guidelines hasn’t changed: Focus on the user. However, we’ve added more guidance and examples of behavior that you should avoid in order to keep your site in good standing with Google’s search results. We’ve also added a set of quality and technical guidelines for rich snippets, as structured markup is becoming increasingly popular.

We hope these updated guidelines will give you a better understanding of how to create and maintain Google-friendly websites.

Keeping you informed of critical website issues

Webmaster level: All

Having a healthy and well-performing website is important, both to you as the webmaster and to your users. When we discover critical issues with a website, Webmaster Tools will now let you know by automatically sending an email with more information.

We’ll only notify you about issues that we think have significant impact on your site’s health or search performance and which have clear actions that you can take to address the issue. For example, we’ll email you if we detect malware on your site or see a significant increase in errors while crawling your site.

For most sites these kinds of issues will occur rarely. If your site does happen to have an issue, we cap the number of emails we send over a certain period of time to avoid flooding your inbox.  If you don’t want to receive any email from Webmaster Tools you can change your email delivery preferences.

We hope that you find this change a useful way to stay up-to-date on critical and important issues regarding your site’s health. If you have any questions, please let us know via our Webmaster Help Forum.

Structured Data Testing Tool

Webmaster level: All

Today we’re excited to share the launch of a shiny new version of the rich snippet testing tool, now called the structured data testing tool. The major improvements are:
  • We’ve improved how we display rich snippets in the testing tool to better match how they appear in search results.
  • The brand new visual design makes it clearer what structured data we can extract from the page, and how that may be shown in our search results.
  • The tool is now available in languages other than English to help webmasters from around the world build structured-data-enabled websites.
Here’s what it looks like:
The new structured data testing tool works with all supported rich snippets and authorship markup, including applications, products, recipes, reviews, and others.

Try it yourself and, as always, if you have any questions or feedback, please tell us in the Webmaster Help Forum.

Written by Yong Zhu on behalf of the rich snippets testing tool team


Website testing & Google search

Webmaster level: Advanced

We’ve gotten several questions recently about whether website testing—such as A/B or multivariate testing—affects a site’s performance in search results. We’re glad you’re asking, because we’re glad you’re testing! A/B and multivariate testing are great ways of making sure that what you’re offering really appeals to your users.

Before we dig into the implications for search, a brief primer:
Website testing is when you try out different versions of your website (or a part of your website), and collect data about how users react to each version. You use software to track which version causes users to do-what-you-want-them-to-do most often: which one results in the most purchases, or the most email signups, or whatever you’re testing for. After the test is finished you can update your website to use the “winner” of the test—the most effective content.

A/B testing is when you run a test by creating multiple versions of a page, each with its own URL. When users try to access the original URL, you redirect some of them to each of the variation URLs and then compare users’ behaviour to see which page is most effective.

Multivariate testing is when you use software to change differents parts of your website on the fly. You can test changes to multiple parts of a page—say, the heading, a photo, and the ‘Add to Cart’ button—and the software will show variations of each of these sections to users in different combinations and then statistically analyze which variations are the most effective. Only one URL is involved; the variations are inserted dynamically on the page.

So how does this affect what Googlebot sees on your site? Will serving different content variants change how your site ranks? Below are some guidelines for running an effective test with minimal impact on your site’s search performance.
  • No cloaking.
    Cloaking—showing one set of content to humans, and a different set to Googlebot—is against our Webmaster Guidelines, whether you’re running a test or not. Make sure that you’re not deciding whether to serve the test, or which content variant to serve, based on user-agent. An example of this would be always serving the original content when you see the user-agent “Googlebot.” Remember that infringing our Guidelines can get your site demoted or removed from Google search results—probably not the desired outcome of your test.
  • Use rel=“canonical”.
    If you’re running an A/B test with multiple URLs, you can use the rel=“canonical” link attribute on all of your alternate URLs to indicate that the original URL is the preferred version. We recommend using rel=“canonical” rather than a noindex meta tag because it more closely matches your intent in this situation. Let’s say you were testing variations of your homepage; you don’t want search engines to not index your homepage, you just want them to understand that all the test URLs are close duplicates or variations on the original URL and should be grouped as such, with the original URL as the canonical. Using noindex rather than rel=“canonical” in such a situation can sometimes have unexpected effects (e.g., if for some reason we choose one of the variant URLs as the canonical, the “original” URL might also get dropped from the index since it would get treated as a duplicate).
  • Use 302s, not 301s.
    If you’re running an A/B test that redirects users from the original URL to a variation URL, use a 302 (temporary) redirect, not a 301 (permanent) redirect. This tells search engines that this redirect is temporary—it will only be in place as long as you’re running the experiment—and that they should keep the original URL in their index rather than replacing it with the target of the redirect (the test page). JavaScript-based redirects are also fine.
  • Only run the experiment as long as necessary.
    The amount of time required for a reliable test will vary depending on factors like your conversion rates, and how much traffic your website gets; a good testing tool should tell you when you’ve gathered enough data to draw a reliable conclusion. Once you’ve concluded the test, you should update your site with the desired content variation(s) and remove all elements of the test as soon as possible, such as alternate URLs or testing scripts and markup. If we discover a site running an experiment for an unnecessarily long time, we may interpret this as an attempt to deceive search engines and take action accordingly. This is especially true if you’re serving one content variant to a large percentage of your users.
The recommendations above should result in your tests having little or no impact on your site in search results. However, depending on what types of content you’re testing, it may not even matter much if Googlebot crawls or indexes some of your content variations while you’re testing. Small changes, such as the size, color, or placement of a button or image, or the text of your “call to action” (“Add to cart” vs. “Buy now!”), can have a surprising impact on users’ interactions with your webpage, but will often have little or no impact on that page’s search result snippet or ranking. In addition, if we crawl your site often enough to detect and index your experiment, we’ll probably index the eventual updates you make to your site fairly quickly after you’ve concluded the experiment.

To learn more about website testing, check out these articles on Content Experiments, our free testing tool in Google Analytics. You can also ask questions about website testing in the Analytics Help Forum, or about search impact in the Webmaster Help Forum.

Introducing the Structured Data Dashboard

Webmaster level: All

Structured data is becoming an increasingly important part of the web ecosystem. Google makes use of structured data in a number of ways including rich snippets which allow websites to highlight specific types of content in search results. Websites participate by marking up their content using industry-standard formats and schemas.

To provide webmasters with greater visibility into the structured data that Google knows about for their website, we’re introducing today a new feature in Webmaster Tools - the Structured Data Dashboard. The Structured Data Dashboard has three views: site, item type and page-level.

Site-level view
At the top level, the Structured Data Dashboard, which is under Optimization, aggregates this data (by root item type and vocabulary schema).  Root item type means an item that is not an attribute of another on the same page.  For example, the site below has about 2 million Schema.Org annotations for Books (“http://schema.org/Book”)


Itemtype-level view
It also provides per-page details for each item type, as seen below:


Google parses and stores a fixed number of pages for each site and item type. They are stored in decreasing order by the time in which they were crawled. We also keep all their structured data markup. For certain item types we also provide specialized preview columns as seen in this example below (e.g. “Name” is specific to schema.org Product).


The default sort order is such that it would facilitate inspection of the most recently added Structured Data.

Page-level view
Last but not least, we have a details page showing all attributes of every item type on the given page (as well as a link to the Rich Snippet testing tool for the page in question).


Webmasters can use the Structured Data Dashboard to verify that Google is picking up new markup, as well as to detect problems with existing markup, for example monitor potential changes in instance counts during site redesigns.

New Crawl Error alerts from Webmaster Tools

Webmaster level: All

Today we’re rolling out Crawl Error alerts to help keep you informed of the state of your site.

Since Googlebot regularly visits your site, we know when your site exhibits connectivity issues or suddenly spikes in pages returning HTTP error response codes (e.g. 404 File Not Found, 403 Forbidden, 503 Service Unavailable, etc). If your site is timing out or is exhibiting systemic errors when accessed by Googlebot, other visitors to your site might be having the same problem!

When we see such errors, we may send alerts –- in the form of messages in the Webmaster Tools Message Center –- to let you know what we’ve detected. Hopefully, given this increased communication, you can fix potential issues that may otherwise impact your site’s visitors or your site’s presence in search.

As we discussed in our blog post announcing the new Webmaster Tools Crawl Errors feature, we divide crawl errors into two types: Site Errors and URL Errors.

Site Error alerts for major site-wide problems

Site Errors represent an inability to connect to your site, and represent systemic issues rather than problems with specific pages. Here are some issues that might cause Site Errors:
  • Your DNS server is down or misconfigured.
  • Your web server itself is firewalled off.
  • Your web server is refusing connections from Googlebot.
  • Your web server is overloaded, or down.
  • Your site’s robots.txt is inaccessible.
These errors are global to a site, and in theory should never occur for a well-operating site (and don’t occur for the large majority of the sites we crawl). If Googlebot detects any appreciable number of these Site Errors, regardless of the size of your site, we’ll try to notify you in the form of a message in the Message Center:

Example of a Site Error alert
The alert provides the number of errors Googlebot encountered crawling your site, the overall crawl error connection rate for your site, a link to the appropriate section of Webmaster Tools to examine the data more closely, and suggestions as to how to fix the problem.

If your site shows a 100% error rate in one of these categories, it likely means that your site is either down or misconfigured in some way. If your site has an error rate less than 100% in any of these categories, it could just indicate a transient condition, but it could also mean that your site is overloaded or improperly configured. You may want to investigate these issues further, or ask about them on our forum.

We may alert you even if the overall error rate is very low — in our experience a well configured site shouldn’t have any errors in these categories.

URL Error anomaly alerts for potentially less critical issues

Whereas any appreciable number of Site Errors could indicate that your site is misconfigured, overloaded, or simply out of service, URL Errors (pages that return a non-200 HTTP code, or incorrectly return an HTTP 200 code in the case of soft 404 errors) may occur on any well-configured site. Because different sites have different numbers of pages and different numbers of external links, a count of errors that indicates a serious problem for a small site might be entirely normal for a large site.

That’s why for URL Errors we only send alerts when we detect a large spike in the number of errors for any of the five categories of errors (Server error, Soft 404, Access denied, Not found or Not followed). For example, if your site routinely has 100 pages with 404 errors, we won’t alert you if that number fluctuates minimally. However we might notify you when that count reaches a much higher number, say 500 or 1,000. Keep in mind that seeing 404 errors is not always bad, and can be a natural part of a healthy website (see our previous blog post: Do 404s hurt my site?).

A large spike in error count could be because something has changed on your site — perhaps a reconfiguration has changed the permissions for a section of your site, or a new version of a script is crashing regularly, or someone accidentally moved or deleted an entire directory, or a reorganization of your site causes external links to no longer work. It could also just be a transient spike, or could be because of external causes (someone has linked to non-existent pages), so there might not even be a problem; but when we see an unusually large number of errors for your site, we’ll let you know so you can investigate:

Example of a URL Error anomaly alert
The alert describes the category of web errors for which we’ve detected a spike, gives a link to the appropriate section of Webmaster Tools so that you can see what pages we think are problematic, and offers troubleshooting suggestions.

Enable Message forwarding to send alerts to your inbox

We know you’re busy, and that routinely checking Webmaster Tools just to check for new alerts might be something you forget to do. Consider turning on Message forwarding. We’ll send any Webmaster Tools messages to the email address of your choice.

Let us know what you think, and if you have any comments or suggestions on our new alerts please visit our forum.